Participating in on-chain pDAO Proposals
Any node with a non-zero voting power may raise or participate in a pDAO proposal at any time. Proposals can be one of the following types:
- Changing pDAO settings
- One-time treasury spends
- Repeat treasury spends (management committees)
- Security council membership
For greater detail and rationale, refer to proposal types. It's important to understand that a pDAO proposal is an on-chain entity that exists to execute changes at the protocol level.
Governance Process
A proposal should be forecasted by the governance process before it ends up on-chain.
Changes to the Rocket Pool protocol and proposed, voted, and executed using a strict, yet transparent governance process. The process begins with an informal discussion of an idea within the Discord community. This idea then progresses to formal discussions in the #governance channel on Discord and the DAO Forum, where it undergoes thorough research, modeling, and scrutiny in preparation for a Rocket Pool Improvement Proposal (RPIP). Following this, a draft RPIP is prepared and reviewed by designated RPIP reviewers to ensure its quality and readiness for presentation to the DAO. The draft proposal is then presented to the DAO on the forum for further review, feedback, and incorporation of any necessary changes. Once the proposal has been refined based on community input, a poll is raised on the DAO forum to gauge readiness for finalizing the RPIP text. If the poll passes, indicating community approval, the RPIP is marked final and ready for a Protocol DAO vote, which is conducted via Snapshot to determine whether the proposal should be implemented.
From here, the Oracle DAO will raise an on-chain proposal. There is a window in which the Protocol DAO, Oracle DAO and community can review the proposal. If consensus is reached, the proposal is executed and changes are applied to the protocol.
A handy dandy visual representation of this process can be found on the Rocket Pool website.
Prerequisite
Please read the lifecycle of a proposal before proceeding. It'll explain the differences between all the voting periods and the actions that can be taken during each period.
The rest of this page will walk you through the steps required for participating in on-chain pDAO proposals.
Initializing Voting
If you are a node operator who registered before the Houston upgrade, you need to initialize voting to unlock voting power. Keep in mind that having at least one minipool is a requirement for having voting power.
This command will raise the prompt below. Please read it carefully:
- If you respond with
direct, voting power will be initialized to your node and you'll be able to vote directly on Protocol DAO proposals. - If you respond with
delegate, you'll have the opportunity to save a bit of gas by initializing voting and setting a delegate within the same transaction.
You only need to do this once. It configures the initial snapshot information for a node. After you initialize voting, every action taken will update your node's snapshot information. Once your voting power is initialized, you can check how much you have using the following smartnode command:
Whenever a new proposal is created, a voting tree representing a snapshot of the network's voting power and delegate info
is created in conjunction with the new proposal. This means your node's voting power won't be included in a proposal if
it was raised before you initialized voting. rocketpool pdao status will display your node's voting power at the
latest block, which may or may not be representative of your voting power on a particular proposal.
Auto Initialize Vote Power
Smartnode version 1.13.8 introduces a new feature Auto Initialize Vote Power, which is designed to automatically
initialize voting power on nodes who have not yet done so. Automatically initialized voting power is self-delegated.
This feature can be configured in the Smartnode settings by running rocketpool service config and navigating to the *
*Smartnode and TX Fees** section.
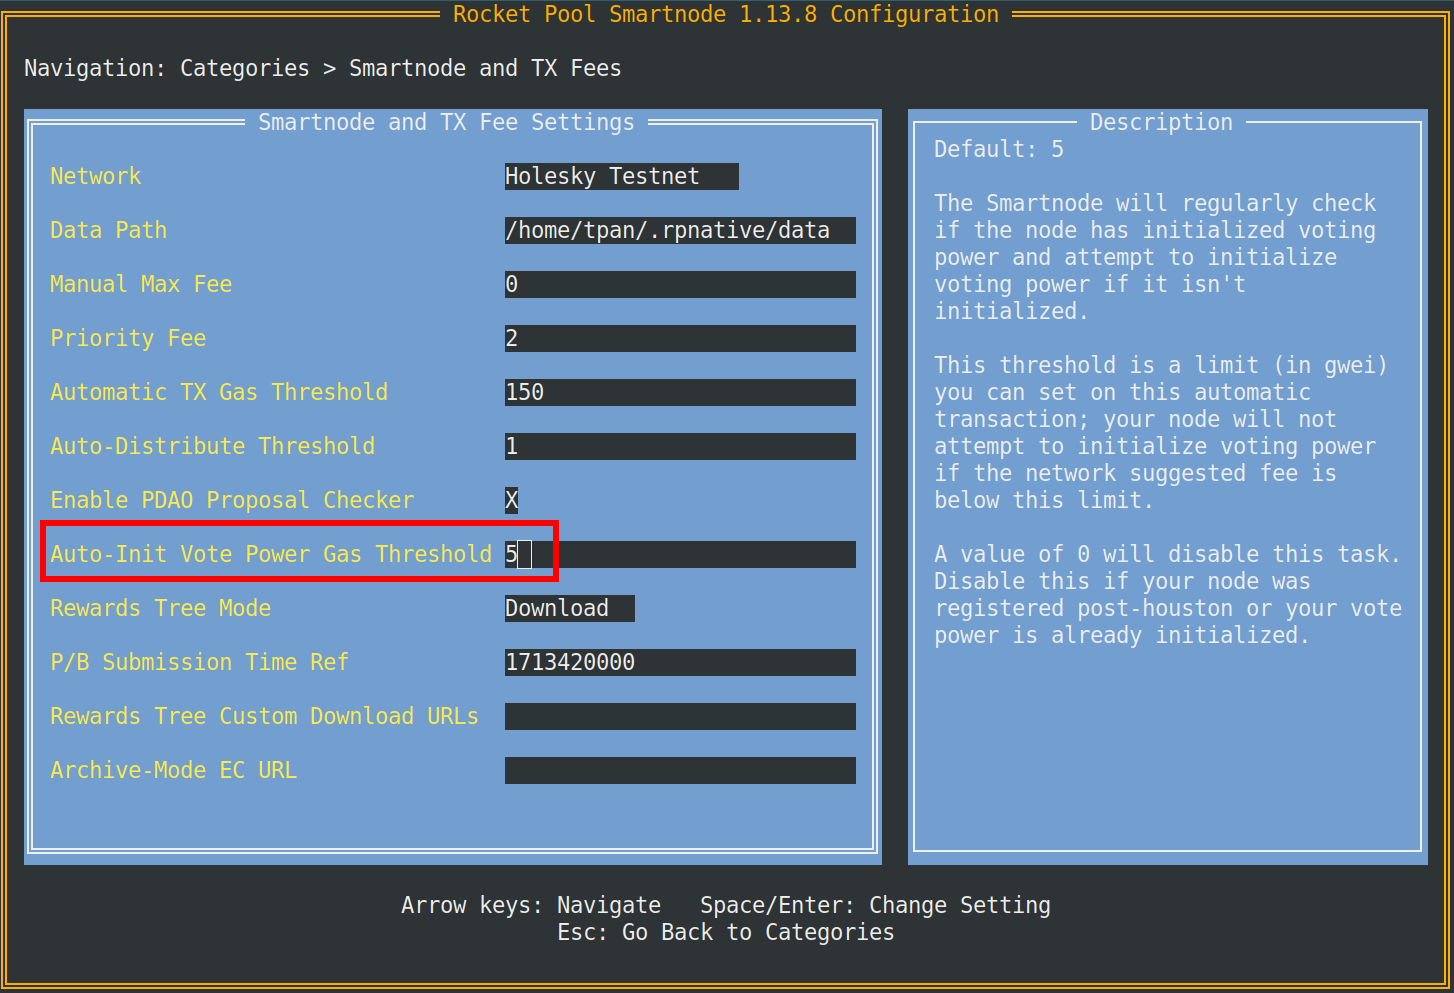
The Auto-Init Vote Power Gas Threshold is a limit (in gwei) on this automatic transaction. You can opt out of this task by setting the threshold to 0. Feel free to opt out if your node was registered after the Houston upgrade or if voting power is already enabled.
Setting your Snapshot Signalling Address
Setting your Snapshot signalling address will allow you to participate in Snapshot votes on a browser or mobile device without having to expose node keys to a hot wallet.
There are a few things to prepare:
- Your node's address
- An address you want to use for snapshot voting (signalling address)
You'll be signing a message saying that your node's address can delegate to the new address. This message states your intent to use your wallet address as a Snapshot signalling address.
Select which network you're using from one of the tabs below.
Do not load your node's private key onto a hot wallet. Please choose another account to be your signalling address. After setting the signalling address, you can use it to vote on Snapshot with your node's voting power.
Start by connecting the address you want to use as a signalling address to the website using MetaMask, WalletConnect, or any of the other methods the website supports. You will then be presented with this dialog to look up your node address.
Next, you'll enter your node address then click the orange "Find" button. This will check if the address is a registered node and then bring you to the next step.
Make sure you have the correct node address before doing this! if you need to confirm your node's address, you can
quickly retrieve it via the CLI using the rocketpool node status command.
Once you've signed in and confirmed your node address, you'll see your Snapshot signalling address. It should be the same as the account you've signed into the site with. Double check that this is correct before proceeding. Once you're confident that you're signed into the desired account, click the orange "Sign Message" button. You'll see a prompt in your wallet extension app to sign the following message:
Signing won't cost you any gas but setting will. After you sign, the frontend will give you a command to paste into the smartnode. Go ahead and paste it into your smartnode's CLI and follow the prompted steps. The command should look something like this:
If you see this message in your CLI, you're all set!
Don't worry if you accidentally close the site or lose track of the command. You can simply repeat the steps and sign
again using the same node address and signalling address. The frontend uses signer.Signmessage() from the ethers
library, which means your signature is deterministic given the same input.
Click here to learn more.
Clearing your signalling address is pretty easy, just use this command in the CLI:
Allowing RPL Locking
You may ignore this step if you are only interested in voting on a proposal. Allowing RPL locking is only required for those who wish to propose or challenge a proposal.
RPL locking is required for proposing and challenging. By default, locking RPL for any purpose, will be disabled. Node operator's will opt-in to performing governance activities by enabling the locking of RPL from their node or primary withdrawal address. You can do so using this command in the Smartnode:
This will prompt you to allow the locking of RPL when creating or challenging governance proposals. Conversely you can use the following command to opt-out of RPL locking:
Locked RPL acts the same way as regular staked RPL for the purposes of rewards, voting, and collateral requirements. Locked RPL is not counted towards thresholds for withdrawing RPL.
Delegating Voting Power
A node operator can elect to delegate their voting power to another node operator. The only requirement is that your delegate is a registered node.
To delegate on-chain voting power to another node, use the following command:
If you've delegated your voting power to another node operator, you can reset this by setting the delegate address to your own node's address.
- During phase 1 of a proposal: Voters and Delegates may cast their vote on a proposal.
- During phase 2 of a proposal: Node Operators who have delegated their vote get the opportunity to overturn their Delegate's vote, if they disagree.
If you are a node operator with delegated voting power, you must vote during voting phase 1 for the delegated voting power to count towards the proposal. Your vote in phase 1 will be worth your local voting power + delegated voting power. Your vote in phase 2 is worth your local voting power only.
Creating a Proposal
In order to be eligible to propose, a node must meet a few requirements:
- Included in snapshotting (either by initializing voting or by registering post Houston)
- Must have at least one minipool
- Has non-zero voting power
- Has allowed RPL locking
- Has an RPL stake (minus any already locked RPL) greater than the proposal bond
Proposals exist to change parameters and execute code at the protocol level! There should be discussion and consensus through the governance process before a proposal is created on chain.
Use the command rocketpool pdao propose to bring up a menu of options
Each of these commands will prompt you with a list of inputs to create your desired proposal. In this guide, we'll invite a node to the security council to serve as an example. To raise a proposal to invite a node to the security council, you would use the command:
Keep in mind that this step will have some slight variation depending on the type of proposal. This particular command:
rocketpool pdao propose security-council invite will prompt you to enter an ID followed by a member address.
After this is included in a block, a pDAO proposal will be created! The proposal will enter the vote delay period upon creation.
Viewing the State of a Proposal
Every proposal is assigned a proposalID. In this case, our proposal to invite 0xBdbc... to the security council is
represented with ID 71. There are a few ways to view the state of the proposal. One method will display a list of
every pdao proposal along with their state (pending, succeeded, executed, etc). The second method displays in-depth
details about a specific proposal.
To list all proposals, use the following command:
This will display a list of all proposals and their state
Here we can see that our proposal invite test-member has an ID of 71 and is in the pending state. In this state,
challengers can dispute the validity of the
merkle pollard (used to calculate voting power) supplied by the proposer. When proposal.vote.delay.time ends,
the proposal will transition into active voting phases. Feel free to review lifecycle of a
proposal for a refresher.
Voting on a Proposal
During a voting period, Node Operators and Delegates can cast a vote with one of four options:
Their voting power will be applied to the option of their choosing. Voting power is a function of "effective RPL stake." A more detailed reading can be found in the rocketpool-research repo.
If you are a node operator with delegated voting power, you must vote during voting phase 1 for the delegated voting power to count towards the proposal. Your vote in phase 1 will be worth your local voting power + delegated voting power. Your vote in phase 2 is worth your local voting power only. Please keep in mind that a node may vote once and only once on a proposal, so choose carefully.
Use this command to cast a vote:
You'll be prompted to select a proposal to vote on if there is at least one proposal in an active voting phase. The menu should display all of the proposals your node is eligible to vote on:
After selecting an option, you'll be asked how you want to cast your vote.
Selecting an option will then display your voting power, and then prompt you to send the transaction:
You've successfully voted on the proposal once the transaction is included in the block! At this point, you may use
rocketpool pdao proposal details <proposal-id> to view the state of the proposal. A proposal needs to reach
proposal.quorum voting power required and a majority voting power for for it to be successful.
For the example above to pass, the voting power needs to exceed a quorum of 140970562215 voting power. There is
197980809837 voting power in favor and no votes against or abstained. The proposal is poised for success and ready
for
execution by the end of proposal.vote.phase2.time.
Executing a Successful Proposal
Congrats! Your proposal has passed! Now all that's left to do is to execute the proposal. Keep in mind that anybody can be the executor to a proposal. To execute a successful proposal, type in the command:
Selecting an option will prompt you to send a transaction. Once this transaction is included in a block, the change will be applied to the Rocket Pool protocol!
Claiming Bonds and Rewards
Proposers or Challengers may claim their bonds upon conclusion of a proposal. Depending on the outcome of a proposal,
a
Proposer or Challenger may or may not be able to claim their proposal.bond and proposal.challenge.bond.
Here are some rules that dictate the conditions in which bonds can be claimed:
- If a proposal is defeated, the proposer forfeits their bond which is divided proportionally amongst the challengers who contributed to the proposal's defeat. All other challengers receive their bond back only.
- Contributing to the defeat of a proposal means a challenger submitted an index which was later proven to be incorrect by the proposers inability to reply to a challenge. It is possible that there are multiple incorrect indices but only those that resulted in the defeat of the proposal share the reward. All other challengers receive their bond back only.
- If a challenger challenges a node, the proposer responds, and the proposal does not get defeated. The proposer can claim the challenge bonds from the invalid challenges.
- If a proposal is defeated, the proposer forfeits their bond which is divided proportionally amongst the challengers who contributed to the proposal's defeat.
Use this command to claim bonds:
This will display every proposal you're eligible to claim bonds from. You can either claim bonds from a specified proposal, or you can claim bonds and rewards from all eligible proposals.
Once you've selected an option, you'll be prompted with the network's current gas costs recommendations; confirm your gas price selection and follow the rest of the prompts.
Note that if you select the first option to claim all available proposals, they will each execute individually and not as one transaction.
Creating a Recurring Treasury Spend
You'll need to prepare a few inputs to create a recurring treasury spend:
- A contract name
- The recipient's address
- Amount of RPL to send per period
- The start time for the recurring payment (as a UNIX timestamp)
- The length of each payment period in hours / minutes / seconds (e.g., 168h0m0s)
- Number of payment periods
The recipient will need to keep note of the contract name in order to claim payments. Don't worry though, as this
information is stored and can be retrieved using the command rocketpool pdao proposals details <proposal-id>
To raise a proposal to set up a recurring treasury spend, use the following smartnode command and follow the prompts:
Here's what it looks like all together:
Once you've entered all the required inputs, a proposal to create a recurring payment will be raised. When the pDAO
passes and executes this proposal, the recipient is allocated 1 RPL starting at 2024-06-09 12:13:53 +0000 UTC
every
720 hours for a total of 24 payments.
Claiming a Recurring Treasury Spend
Claiming recurring payments should be pretty simple! Navigate to our frontend tool here to do so. If you're trying this out on Hoodi testnet, use this link instead.
Once you're on the site, click the connect wallet button. Please read through and accept the Terms of Service & Privacy Policy, this will enable different ways to connect, then click connect metamask.
MetaMask will prompt you to select an account to connect to the website. After you've signed in, you'll need to enter the contract name. Doing so will display all the relevant details. Make sure you double check the recipient's address. Anybody can call the claim function, but each payment contract will have a designated recipient to disperse RPL towards.
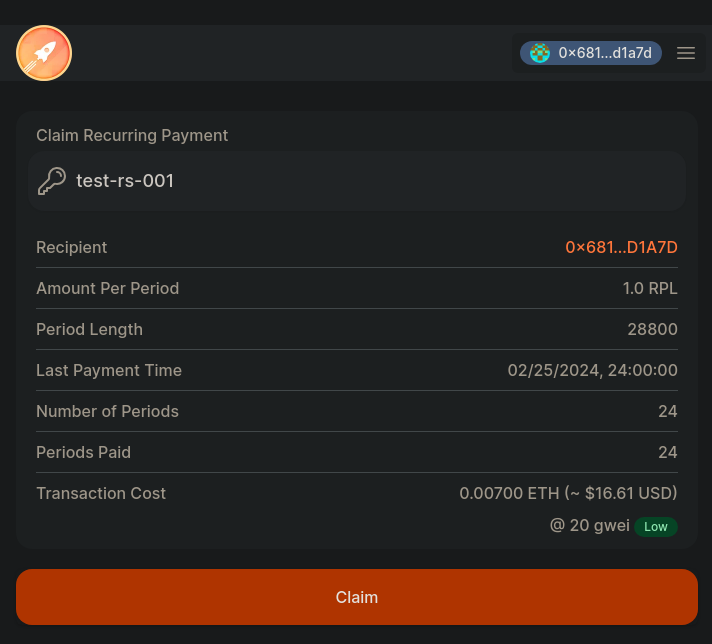
You can claim your payments at any time, you'll just get the total unclaimed RPL up until the most recent period. Alternatively you can wait until all periods have passed to collect all at once and save on gas.
Just hit the big orange claim button when you're ready and review the transaction in metamask (or your preferred wallet). Once that's done, you're all set!