Staking via a Decentralized Exchange on the Ethereum Network (Layer 1)
As a reminder, you do not have to swap ETH for rETH directly via Rocket Pool in order to enjoy the benefits of decentralized staking. All you need to do is hold rETH as it inherently grows in value - how you get it doesn't matter!
rETH is available for trade on several decentralized exchanges, such as Balancer and Uniswap.
The Balancer pool is a special kind of pool known as a metastable pool. Metastable pools are ideal for tokens like rETH, because they honor the true exchange rate reported by the Oracle DAO.
This means exchanging with this pool will have much lower slippage and lower fees than a conventional decentralized exchange, so you get a much better deal when buying or selling rETH. Other decentralized exchanges don't have this property, so you may find that their exchange rate is slightly lower.
Regardless of which pool you use, they all tend to have lower gas fees than staking via the official Rocket Pool website. This makes them a great choice for users that want to stake a small amount of ETH, though it's always a good idea to compare the rate you would receive on an exchange with the exchange rate according to Rocket Pool.
In the following examples, we will show how to swap ETH for rETH using both Balancer and Uniswap.
Currently this method is only available on Mainnet. If you want to practice on the Hoodi Testnet, you must swap with Rocket Pool directly.
The rest of this guide will assume you are on Mainnet.This process can be completed with any web3-compatible wallet. For demonstration purposes, we're going to use MetaMask as it is one of the more popular wallet choices.
You should be able to follow along using similar steps with a different wallet if you choose - just find the comparable function in your wallet for each step.
Setting up MetaMask
Start by installing MetaMask if you haven't already. Follow the instructions on their site to install the extension, create an account, and sign in.
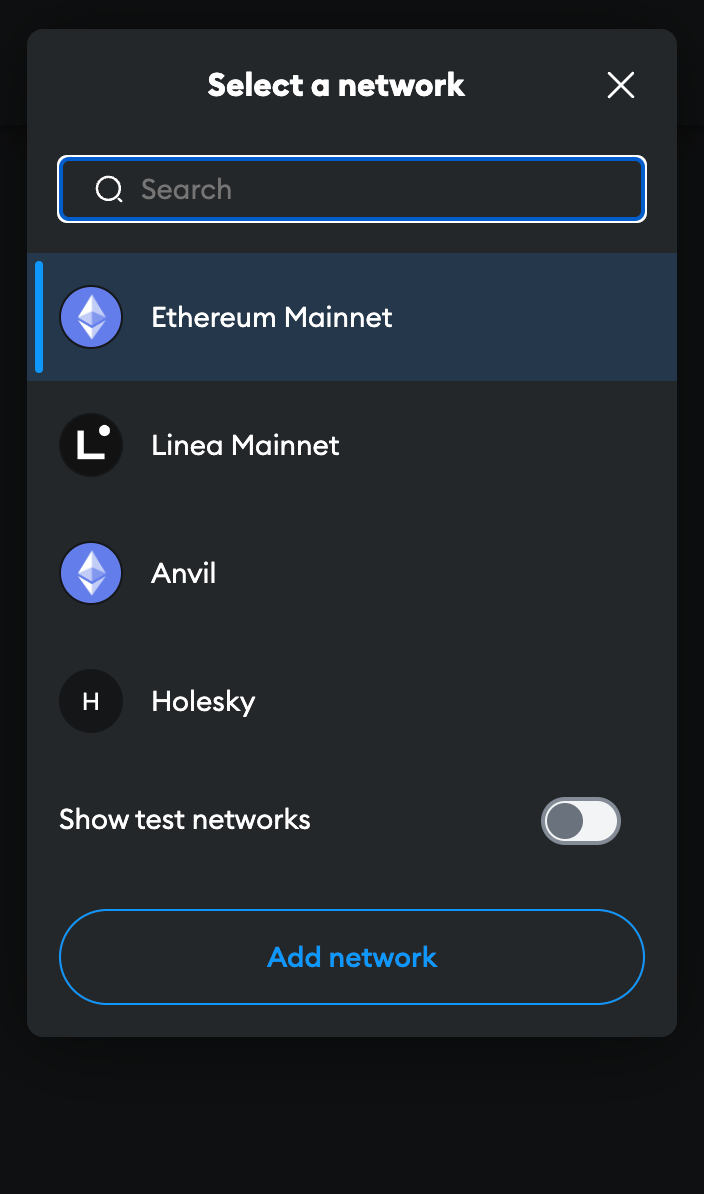
Next, open the MetaMask panel using its icon in your browser toolbar. Click on the network dropdown in the toolbar at the top and ensure that Ethereum Mainnet is selected:
Finally, add the rETH token to MetaMask so you can see your balance and access it for trading. Click the Assets tab, then click Add Token:

Ensure that Custom Token is selected in this dialog. In the Token Contract Address box, put the following value:
The Token Symbol should automatically be populated with rETH, and the Decimals of Precision should automatically be populated with 18.
Accept the rest of the prompts, and then you will see the rETH token appear in your list.
Now that you have a wallet address in MetaMask, you need to transfer some ETH into it. You will need to supply this from an existing wallet or buy ETH on an exchange.
Swapping for rETH via Balancer
Now that your wallet is set up and funded, head to this URL which will open Balancer and automatically show swapping ETH for rETH:
https://app.balancer.fi/#/trade/ether/0xae78736Cd615f374D3085123A210448E74Fc6393
The page will look like this initially:

Click on the Connect wallet button in the top-right corner.
You will be prompted with a screen that asks you which wallet provider you want to use.
For this example, select MetaMask.
If you're not using MetaMask, one of the other providers such as WalletConnect will likely be compatible with your wallet.
Upon clicking that button, MetaMask will pop up with a prompt asking you to select which accounts you want to use. Assuming you only have one, your account should already be selected. Click Next.
It will then ask if you would like to give Balancer access to view the addresses of your accounts:
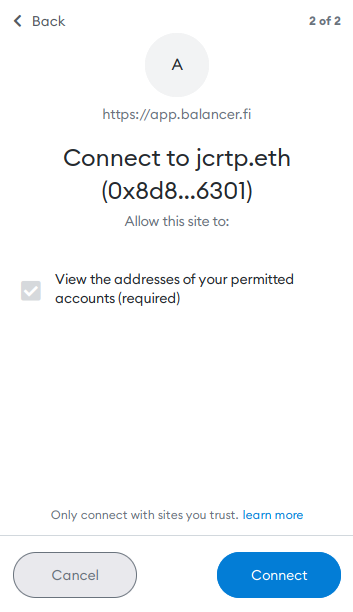
Click Connect and after a brief pause window, your wallet will be connected to Balancer. You should now see its ETH balance in the top left side of the screen.
Now, enter the amount of ETH you want to swap and Balancer's UI will show you the amount of rETH you will receive in return:

Notice that the amount of rETH you receive will be less than the amount of ETH you put in. This is normal, because rETH is worth more than ETH and continuously appreciates over time. You can see this in the exchange rate highlighted at the right of the screenshot.
Click Preview to see the details of the trade, including the minimum amount you could receive due to slippage. If you're satisfied, click Confirm trade. This will send the request to MetaMask, where you can review the total transaction cost before confirming it:
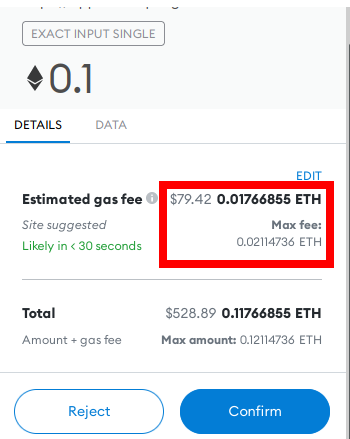
Pay close attention to the estimated gas fee here, highlighted in red. If it's a significant amount of your overall transaction (here it's over 17%), then it will take a very long time before you break even on staking rewards.
If this is the case, you should either wait for the network's average gas price to drop, or consider using a Layer 2 solution instead.
If you are happy with the gas fees relative to the total amount of rETH you'll be receiving, click Confirm to submit the transaction. After a short period, you should see a notification from MetaMask that it completed successfully, and you will now see the rETH token in your wallet.
That's it! You're now staking with Rocket Pool. All you need to do is hold onto your rETH, and you'll automatically gain your staking rewards as the value of the rETH token increases.
Swapping for rETH via Uniswap
While we recommend you stake through Balancer because it has lower fees and a more accurate ETH-rETH rate, you can also swap for rETH via Uniswap if the need arises. Head to this URL which will open Uniswap and automatically show swapping ETH for rETH:
You may initially be prompted with a warning that looks like this:
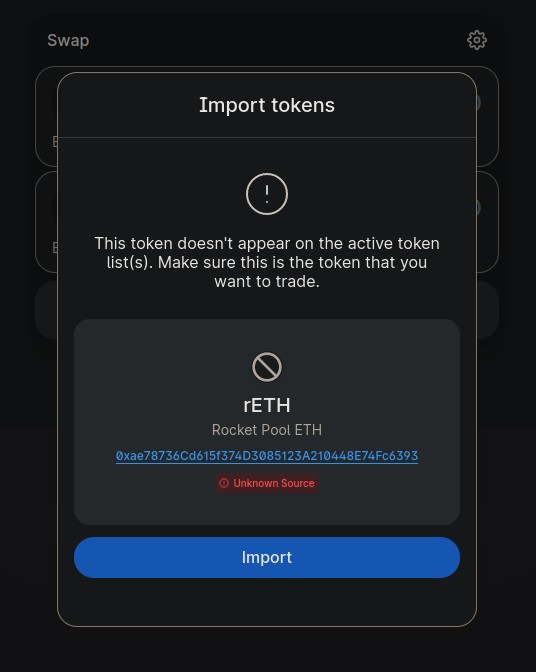
This is just a temporary warning until Uniswap adds rETH to its canonical token list.
As long as the token address is 0xae78736cd615f374d3085123a210448e74fc6393, you can add it safely.
The page will look like this initially:
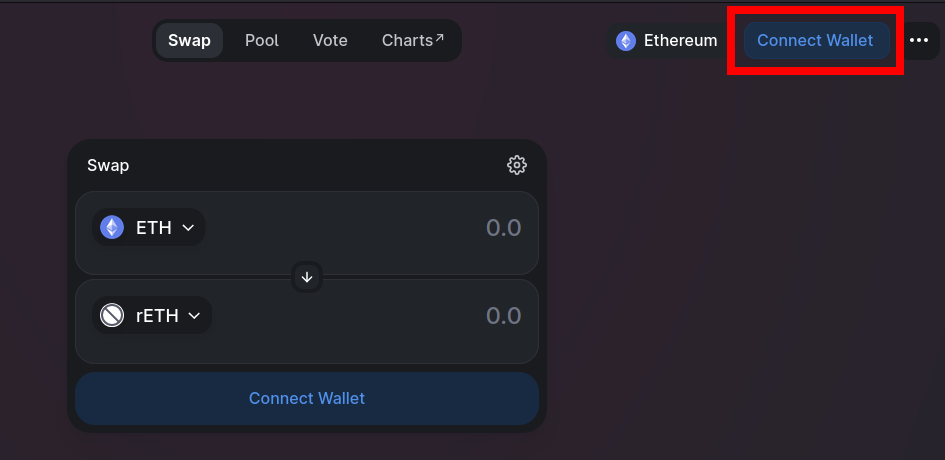
Click on one of the Connect Wallet buttons such as the highlighted one in the top-right corner.
You will be prompted with a screen that asks you which wallet provider you want to use.
For this example, select MetaMask.
If you're not using MetaMask, one of the other providers such as WalletConnect will likely be compatible with your wallet.
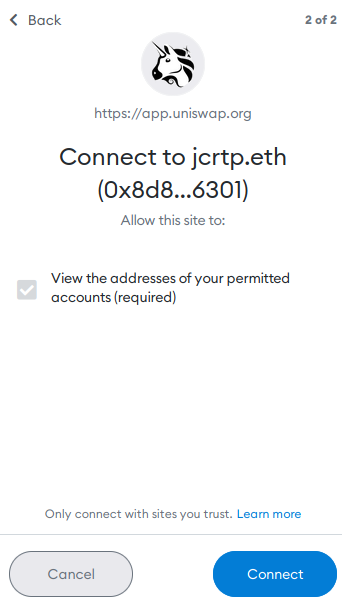
Upon clicking that button, MetaMask will pop up with a prompt asking you to select which accounts you want to use. Assuming you only have one, your account should already be selected. Click Next.
It will then ask if you would like to give Uniswap access to view the addresses of your accounts:
Click Connect and after a brief pause window, your wallet will be connected to Uniswap. You should now see its ETH balance in the top right corner of the screen.
Now, enter the amount of ETH you want to swap and Uniswap's UI will show you the amount of rETH you will receive in return:

Notice that the amount of rETH you receive will be less than the amount of ETH you put in. This is normal, because rETH is worth more than ETH and continuously appreciates over time. You can see this in the exchange rate highlighted at the bottom of the screenshot.
Click Swap to see the details of the trade, including the minimum amount you could receive due to slippage. If you're satisfied, click Confirm Swap. This will send the request to MetaMask, where you can review the total transaction cost before confirming it:
Pay close attention to the estimated gas fee here, highlighted in red. If it's a significant amount of your overall transaction (here it's over 17%), then it will take a very long time before you break even on staking rewards.
If this is the case, you should either wait for the network's average gas price to drop, or consider using a Layer 2 solution instead.
If you are happy with the gas fees relative to the total amount of rETH you'll be receiving, click Confirm to submit the transaction. After a short period, you should see a notification from MetaMask that it completed successfully, and you will now see the rETH token in your wallet.
That's it! You're now staking with Rocket Pool. All you need to do is hold onto your rETH, and you'll automatically gain your staking rewards as the value of the rETH token increases.