Rocket Pool
Rocket Pool
Overview
Guides
Website
简体中文
English
Overview
Guides
Website
简体中文
English
Rocket Pool

Guides

Overview
The Saturn 0 Upgrade

rETH Staker Guide

Overview
Staking directly via Rocket Pool
Staking via a Decentralised Exchange on the Ethereum Network (Layer 1)
Staking via a Decentralised Exchange on Layer 2
Staking on behalf of a node

Node Operator Guide

A Node Operator's Responsibilities
Node Requirements & Choosing a Platform

Preparing a Local Node

Overview
Selecting Staking Hardware
Preparing a PC, Mini-PC or NUC
Preparing a Mac
Intro to Secure Shell (SSH)

Preparing a Server Node

Overview
Selecting a Hosting Provider
Preparing the Operating System

Securing Your Node

Securing Your Node
Tailscale

Installing Rocket Pool

Overview
Choosing your ETH Clients
Selecting a Rocket Pool Mode
Creating a Standard Rocket Pool Node with Docker
Creating a Native Rocket Pool Node without Docker

Configuring Rocket Pool

Overview
Configuring the Smartnode Stack (Docker/hybrid mode)
Configuring the Smartnode Stack (native)
Advanced Smartnode Configuration for Docker Mode

Provisioning your Node

Overview
Starting Rocket Pool
Creating a New Wallet
Importing/Recovering an Existing Wallet
Preparing your Node for Operation
Intro to the Command Line Interface
Specifying a Fallback Node
Fee Distributors and the Smoothing Pool
MEV, MEV-Boost & MEV Rewards

Creating or Migrating Minipools

Overview
Creating a new Minipool (Validator)
The Minipool Delegate
Converting a Solo Validator into a Minipool
Migrating a 16-ETH Minipool to 8-ETH
The Deposit Credit System

Monitoring & Maintenance

Overview
Monitoring your Node's Performance
Setting up the Grafana Dashboard
Smartnode Stack Alert Notifications
Checking for Updates
Backing Up Your Node
Masquerading as Another Node Address
Expiring Pre-Merge History
Pruning the Execution Client
Changing Execution or Consensus Clients
Moving from One Node to Another

Claiming Rewards

Overview
Claiming Node Operator Rewards
Distributing Skimmed Rewards

Participating in pDAO governance

Overview
The Protocol DAO
Participating in on-chain pDAO Proposals
Setting your Snapshot Signalling Address
Delegating Voting Power
Viewing the State of a Proposal
Voting on a Proposal
Creating a Proposal
Executing a successful proposal
Claiming Bonds and Rewards
Creating and Claiming a recurring treasury spend

Exiting your Minipools

Shut Down a Minipool
Rescuing a Dissolved Minipool
FAQ (WIP)

Testing Rocket Pool with the Hoodi Test Network

Practicing with the Test Network
Migrating from the Test Network to Mainnet

Running an Oracle DAO Node

The Rocket Pool Oracle DAO
Setting up an Oracle DAO Node
Testing your Oracle DAO Node
Monitoring your Oracle DAO Node
Oracle DAO Proposals

Legacy Guides

Upgrading to Smartnode v1.3.x
Migrating the Smartnode from Previous Beta Tests
The Atlas Update
Lower ETH Bond Minipools

Redstone & The Merge

The Rocket Pool Redstone Update
[Docker Mode] Guide to the Redstone Update and the Merge
[Hybrid Mode] Guide to the Redstone Update and the Merge
[Native Mode] Guide to the Redstone Update and the Merge

The Houston Upgrade

Overview
Getting Started with Houston
The Protocol DAO
Participating in Proposals
Stake ETH on Behalf of Node
RPL Withdrawal Address
Preparing a Raspberry Pi
📝 Edit this page on GitHub
Previous PagePreparing a PC, Mini-PC or NUC
Next PageIntro to Secure Shell (SSH)

#Preparing a Mac

Before installing Rocket Pool, there are a few checks you should do to make sure your system is compatible and will work correctly.

DANGER

We strongly encourage you to create a dedicated machine for running a Rocket Pool node. Running a node on a general-use machine, such as your daily work desktop, presents extra security risks that may compromise your wallet and result in the theft of your coins.

For maximum safety, please build a new machine that is dedicated exclusively to running a node.

#System Requirements

Below is a brief description of the software and hardware requirements that a Rocket Pool node requires. This guide assumes that you already have your machine physically built, and the operating system installed.

#Supported Operating Systems

Rocket Pool recommends you use the latest version of macOS for your hardware.

#macOS Support

You will need to install the following pre-requisites:

We highly recommend using Homebrew as your package manager for Mac. It allows you to install packages easily using the brew command.

You can install it via

/bin/bash -c "$(curl -fsSL https://raw.githubusercontent.com/Homebrew/install/HEAD/install.sh)"

It should install some pre-requisites for you, such as XCode Command Line Tools. If it doesn't, you can install them manually using

xcode-select --install

Once installed, ensure everything is working correctly by using

brew doctor

Once everything is installed & working, Homebrew will allow you to install packages using the brew command.

For example, to install wget using Homebrew execute the following command in the Terminal:

brew install wget

Now that we have Homebrew installed, we can install our Docker client, Orbstack.

brew install --cask orbstack

Orbstack will be installed to your Applications folder. Launch it from there and it will initialise. If you are migrating from Docker Desktop, it should detect your existing Docker installation and migrate your images and containers.

You may need to adjust your Orbstack settings depending on your hardware.

If you have previously installed Docker Desktop, you will need to uninstall it first. Docker Desktop used to be the recommended Docker Client however in the last year a few new clients have been released that provide much better stability.

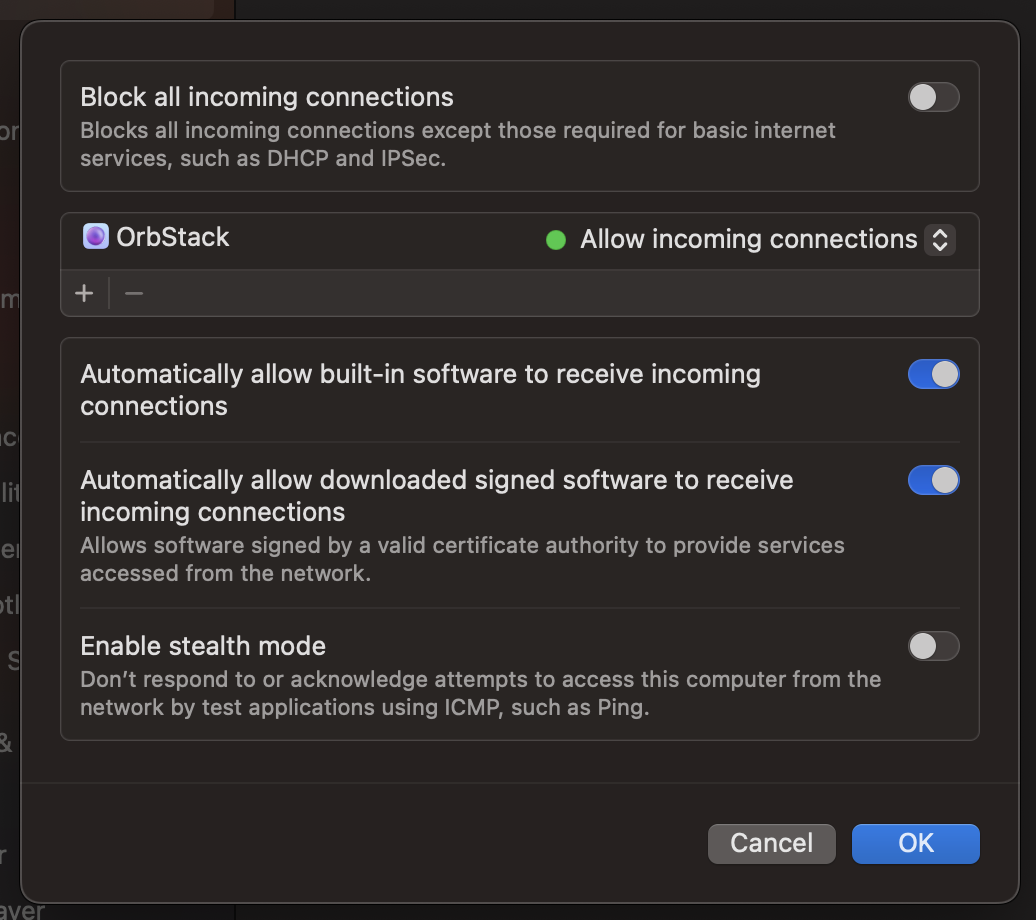
Please ensure your Firewall (System Settings -> Network -> Firewall) is turned on and Orbstack is added to the list of applications allowing incoming connections. (Orbstack should do this for you)

#Installing and Using SSH

SSH should already be installed with macOS.

#Pre-installation System Checks

Before installing Rocket Pool, please review the following checklist:

  • Your system is fully built, powers on, and can boot into the operating system.
  • You will not do any other activity on the system, such as browsing the Internet, checking email, or playing games.
  • You have a macOS operating system installed.
  • Your user account has root / administrator privileges.
  • You have an SSD that meets the performance requirements.
  • Your SSD is mounted on your file system.
  • You have at least 1.5TB of space free for the initial Execution and Consensus syncing process.
  • If your ISP caps your data, it is more than 2 TB per month.

If you have checked and confirmed all of these items, then you are ready to install Rocket Pool and begin running a node! Move on to the Choosing your ETH Clients section.